Logic app is one of the most usable Paas Service offering by MS and it can be leveraged for many day to day activities and to achieve some tricky tasks as well. Sending a customized email is one of the most asked question by business to get notified on any event which generates a trigger.
Uses of Logic App in sending the automated email with some sort of customization that would make your email look professional and at the same time it looks nice in representation.
Here we are going to see the steps to create a logic app.
The first step to identify how your logic app is going to trigger.
you want get an email whenever a Monthly file is dropped in your Blob which is quite important to have track of it then you can use the event grid action or you can simply choose the blob activity and you can select the trigger as WHEN BLOB IS CREATED.
Here we are demonstrating a logic app which will send the input to the logic app from our ADF V2/ Synapse Pipeline to trigger an email using Pipelines.
Creation of Logic App. Follow the below steps to create.
step1:
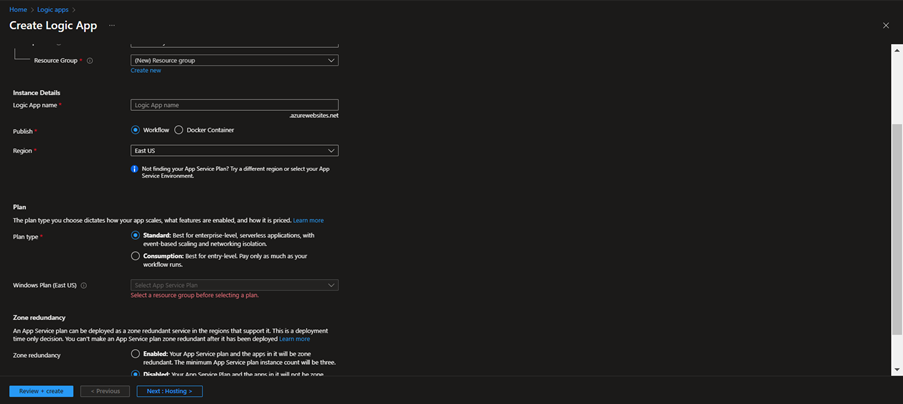
First we have to start with the HTTP action and configure the JSON schema for it. Navigate to the Azure Portal and select the Logic app from the search bar and click on ADD to create a new Logic App.

step2:
Fill the required details as per your environment specification in the form and click on Review+Create.
Step3:
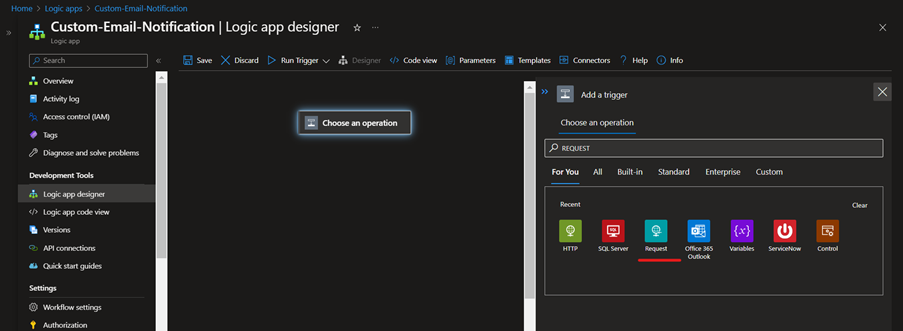
Now you have created a logic app. Click on the newly created logic app and you can see the Logic App Designer option in left Pane of it.

Designing Logic App
Click on the choose an operation symbol and search for REQUEST and select the trigger as WHEN HTTP request is received. you will get the below action.

Once you click on it, you will see the window to mention your Json Code. Click on the option below to get the nice window where you can specify your JSON structure.

You can paste the below JSON or you can modify as per your requirement.
{
    "DataFactoryName": "",
    "PipelineName": "",
    "PipelineRunId": "",
    "color": "",
    "message": "",
    "receiver": "",
    "subject": "",
    "title": ""
}
Once you click on OK you can see the JSON created in the window. Now you can go ahead and add the next action. Now you can click on + which will give you the window to search for the action. Type Initialize variable Action to select.
Since the Initialize Variable supports the HTML, you can leverage that to customize the email body as per your requirement.
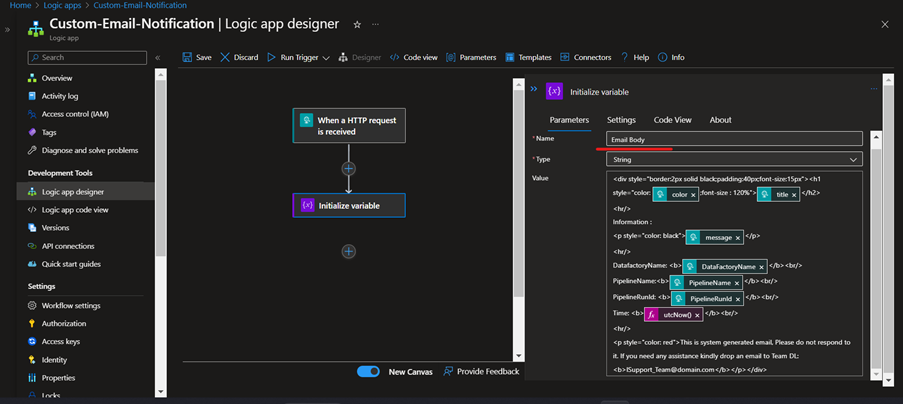
Mention the Name of the Initialize variable so that it can referenced in the lower action.
The Value should have your HTML code and values that has been passed dynamically that is coming from the JSON schema which is derived from Request action. The values for the JSON will be passed from the ADF/SYNAPSE Pipeline.
Here is the HTML code:
<div style="border:2px solid black;padding:40px;font-size:15px"><h1 style="color: @{triggerBody()?['color']};font-size : 120%">@{triggerBody()?['title']}</h1>
<hr/>
Information :
<p style="color: black">@{triggerBody()?['message']}</p>
<hr/>
DatafactoryName: <b>@{triggerBody()?['DataFactoryName']}</b><br/>
PipelineName:<b>@{triggerBody()?['PipelineName']}</b><br/>
PipelineRunId: <b>@{triggerBody()?['PipelineRunId']}</b><br/>
Time: <b>@{utcNow()}</b><br/>
<hr/>
<p style="color: red">This is system generated email, Please do not respond to it. If you need any assistance kindly drop an email to Business Analytics Team DL: <b>Support@blog.impulsewebsolution.com</b></p></div>
Then you can go ahead and Add the Action (EMAIL) to send the email to a DL or to a individual person.

Note: You need to have an account from which you can make the connection, that connection will be used to send the email.

At last, we will Add the Response Action so that it can be a synchronous with the source from where it is being called.

You can mention the body or if you want to get the response or text or something but here, I have just kept the code 200 so that it can be in sync with the source.
Here we are done with the logic app design and now it can be called from the Pipeline.
Once you click on save then only the logic app will generate the URL. You can view the URL by clicking on the First Request action on the right side.
Calling the Logic app from Pipeline.
You need to use the web activity to call the URL.

Passing the value to the JSON schema:

Final Email:


